Start direct chat
Direct chats in Famedly are equipped with robust end-to-end encryption, ensuring that only the participants within the chat room can decrypt and access the messages exchanged. This heightened security measure provides a secure environment for confidential conversations.
To initiate a direct chat with other individuals in Famedly, follow these steps:
Start chat by using user search
Desktop
- Click the + Button next to the filter in the top left area of your screen.
- Select or search the person you want to invite to the chat.
- Click Start Chat to start a chat.
Mobile
- Tap the + Button in the top right area of the screen.
- Select or search the person you want to invite to the chat.
- Tap the Start Chat to start a chat.
Start chat with QR code
Show own QR code to other users
Desktop
- Click the + Button.
- Click the QR code icon button in the bottom right corner of the dialog.
- Let someone else scan the QR code with a mobile device.
Mobile
- Tap the + Button in the top right area of the screen.
- Tap the QR code icon button in the bottom right corner of the dialog.
- Let someone else scan the QR code with a mobile device
Scan QR code of other users (Mobile only)
- Tap the + Button in the top right area of the screen.
- Tap the QR code icon button in the bottom right corner of the dialog.
- Tap Scan QR code.
- Scan the QR code of the other user with your camera.
- Tap the Send message button.
Start chat by entering user ID
Copy own user ID
Desktop
- Click the + Button.
- Click the QR code icon button in the bottom right corner of the dialog.
- Select the user ID and press Ctrl+C to copy it.
Mobile
- Tap the + Button in the top right area of the screen.
- Tap the QR code icon button in the bottom right corner of the dialog.
- Select the user ID and tap Copy.
Start chat with a specific user ID
Desktop
- Click the + Button.
- Click the QR code icon button in the bottom right corner of the dialog.
- Type in the other users’ user ID in the Add contact via user ID input field.
- Click the + button in the input field.
- Click the Send message button.
Mobile
- Tap the + Button in the top right area of the screen.
- Tap the QR code icon button in the bottom right corner of the dialog.
- Type in the other users’ user ID in the Add contact via user ID input field.
- Tap the + button in the input field.
- Tap the Send message button.
Create a private or public group chat
Types of rooms: private vs. public
When creating a new room, you can choose between Private and Public groups.
Private groups
- Can only be joined via invitation.
- Do not appear in the search or room list for users who are not members.
- Can include both internal and external members.
- You can restrict participation to internal users only by enabling the Internal members only switch (default setting).
- Are always end-to-end encrypted. Encryption cannot be disabled.
- When a user is invited to a private group, they can only read messages from the moment they join — previous messages remain unreadable for them.
Public groups
- Can be discovered and joined by anyone in the same organization via the search dialog.
- Are always limited to internal members only (within the same organization).
- Are shown in a separate “Public Groups” tab in the search.
- Do not require an invitation to join.
- You can choose whether to enable or disable encryption (encryption is enabled by default).
- If encryption is enabled, new members can only read messages from the moment they join.
- If encryption is disabled, all messages in the room are visible even to users who join later.
Desktop
- Click the + Button next to the filter in the top left area of your screen.
- Click New Group in the top right corner.
- Enter a group name.
- Choose the room visibility:
- Private group (invite only) → default
- Public group
- Depending on your selection, configure additional settings:
- For Private groups: Toggle Internal members only (enabled by default)
- For Public groups: Toggle Enable end-to-end encryption (enabled by default)
- Select or search people to invite (filtered if “internal members only” is active)
- Click Create to finish setup.
Mobile
- Tap the + Button in the top right area of the screen.
- Tap New Group in the top right corner.
- Enter a group name.
- Choose the room visibility:
- Private group (invite only) → default
- Public group
- Depending on your selection, configure additional settings:
- For Private groups: Toggle Internal members only (enabled by default)
- For Public groups: Toggle Enable end-to-end encryption (enabled by default)
- Select or search people to invite (filtered if “internal members only” is active)
- Click Create to finish setup.
Discover and join public rooms
You can now search for and join public rooms that were created within the same organization as you. Public rooms are ideal for open topic discussions and information sharing.
Search and join a public room
- Desktop
- Click the + Button next to the filter in the top left area of your screen.
- Search for a public room you want to join and optionally filter the results to Public Rooms.
- Click on a public room to open its preview.
- Click Join Room to enter the room.
- Mobile
- Tap the + Button in the top right area of the screen.
- Search for a public room you want to join and optionally filter the results to Public Rooms.
- Tap a room in the results to preview it.
- Tap Join Room to enter the room.
Join chat
You can join chats in two ways: by invitation or by discovering a public room.
Join via invitation
Desktop
- You can only join a chat if you have received an invitation.
- All invitations can be found at the top of the chats list.
- Click the chat you have been invited to.
- Accept the invitation.
Mobile
- You can only join a chat if you have received an invitation.
- All invitations can be found at the top of the chats list.
- Click the chat you have been invited to.
- Accept the invitation.
Join via public room
To discover and join public rooms, see Discover and join public rooms.
Mute chat
It is possible to mute notifications for chats. This can be helpful if many members communicate in a group and you do not necessarily want to be informed about new messages.
Desktop
- Click the three dots in the top right corner inside the chat you want to mute.
- Click the Mute chat to mute the chat.
Mobile
- Tap the three dots in the top right corner inside the chat you want to mute.
- Tap the Mute chat to mute the chat.
Leave chat
You can leave chat rooms at any time and thus end the conversation. If you left a chat, the history of the chat is still available in the archive.
Desktop
- Click the three dots in the top right corner of a chat's screen.
- Click Leave chat.
Mobile
- Tap the three dots in the top right corner of a chat's screen.
- Tap Leave chat.
Export chat history
You can export your chat history to store important conversations or meet documentation requirements. Choose a format (CSV, PDF, HTML, JSON), a timeframe, and optionally include media files.
Desktop
- Open the chat you want to export.
- Click the three dots in the top right corner to open the chat menu.
- SelectExport Chat.
- In the export dialog, choose:
- File format (CSV, PDF, HTML, JSON).
- Timeframe (custom range or start from oldest message).
- Click Export to start the export process.
- Total events: Events include messages, reactions and room actions like edits or membership changes.
- Unable-to-decrypt messages: Messages that couldn't be decrypted due to missing keys.
- Different users found: Number of participants contributing to the conversation.
- Files and media: Number of media elements that can be exported separately.
- When the export is ready, either click "Continue with Media Export" or "Complete without media", depending on whether you also want to export files along with your chat messages.
With media export
- Select the files you want to export (max. 8 MB per batch).
- Click Export unit to download the selected files. Downloaded files will be saved in the default download folder of your device.
- Repeat as needed.
Without media export
The exported messages will be saved to the default download folder of your device.
- You have successfully exported the chat!
Mobile
- Open the chat you want to export.
- Tap the three dots in the top right corner to open the chat menu.
- Select Export Chat.
- In the export dialog, choose:
- File format (CSV, PDF, HTML, JSON)
- Timeframe (custom range or start from the oldest message)
- Tap Export to start the export process.
- Total events: Events include messages, reactions and room actions like edits or membership changes.
- Unable-to-decrypt messages: Messages that couldn't be decrypted due to missing keys.
- Different users found: Number of participants contributing to the conversation.
- Files and media: Number of media elements that can be exported separately.
- When the export is ready, either tap "Continue with Media Export" or "Complete without media", depending on whether you also want to export files along with your chat messages.
With media export
- Select the files you want to export (max. 8 MB per batch).
- Tap Export unit to download the selected files. Select a location for the downloaded files.
- Repeat as needed.
Without media export
Select a location for your exported chat.
- You have successfully exported the chat!
Delete left chats
To save disk space on your device, you can clear the archive and delete all archived chats. To be able to delete a chat on the device, you must first leave it.
Desktop
- Click your Profile Picture or Name Initials in the top left corner of the screen to open the settings.
- Click Archive.
- Click the three dots in the top right corner of the screen.
- Click Clear archive.
- Click Delete.
Mobile
- Tap your Profile Picture or Name Initials in the top left corner of the screen to open the settings.
- Tap Archive.
- Tap the three dots in the top right corner of the screen.
- Tap Clear archive.
- Tap Delete.
Check the status of users
You can see the status of other users on the profile pictures in the following places:
- in the chats list
- in the contact list (when opening a new chat)
- on the title bar of 1:1 chats
- in group chats above the single messages from other users
- in the member list of group chats
Which symbol shows which status?
Active → Green dot on the profile picture Away → Grey dot on the profile picture → Also shown if the user has disabled sending presences
Also you can see the status as text in the title bar of 1:1 chats. In previous versions "online" has been displayed instead of "active". If the user has set up an optional status message, this will be shown instead of "active". The dots on the profile picture will still show if the user is active.
What does this status mean?
Active → The user has the app open and visible on a screen on a mobile device or the web version of the app is open in a browser tab
Away → The user is shown as away if they have not actively used the app for at least 10 minutes. This means that the app has been closed or moved to the background on a mobile device, or that the browser tab containing the web version of the app has been closed.
Group chat settings
Edit a group name
The chat name appears in the group header, and admins of the group can modify it. There is no limitation in the subject length and it can include emoji. However we suggest to keep the subject short. Can be up to 250 characters in length and can include emoji.
Desktop
- Click the three dots in the top right corner of a group's screen to open the menu.
- Click the Chat details button to open the group settings.
- Click Edit in the top right corner.
- Edit the name.
- Click Save to finish the process.
Mobile
- Tap the three dots in the top right corner of a group's screen to open the menu.
- Tap the Chat details button to open the group settings.
- Tap Edit in the top right corner.
- Edit the name.
- Tap Save to finish the process.
Add or edit a group description
From both your desktop and mobile devices, you can see group descriptions when viewing group details. There is no limitation in the subject length and it can include emoji.
Desktop
- Click the three dots in the top right corner of a group's screen to open the menu.
- Click the Chat details button to open the group settings.
- Click
Add descriptionto add a description orEditnext to the description header to edit the description.
- Add or edit the description.
- Click Save to finish the process.
Mobile
- Tap the three dots in the top right corner of a group's screen to open the menu.
- Tap the Chat details button to open the group settings.
- Tap
Add descriptionto add a description orEditnext to the description header to edit the description.
- Add or edit the description.
- Tap Save to finish the process.
Set group picture
Desktop
- Click the three dots in the top right corner of a group's screen to open the menu.
- Click the Chat details button to open the group settings.
- Click Edit in the top right corner.
- Click the placeholder image with the group name initials.
- Select picture from your file system.
- Click Save to finish the process.
Mobile
- Tap the three dots in the top right corner of a group's screen to open the menu.
- Tap the Chat details button to open the group settings.
- Tap Edit in the top right corner.
- Tap the placeholder image with the group name initials.
- Select picture from your file system.
- Tap Save to finish the process.
Change group picture
Desktop
- Click the three dots in the top right corner of a group's screen to open the menu.
- Click the Chat details button to open the group settings.
- Click Edit in the top right corner.
- Click the profile picture.
- Select picture from your file system.
- Click Save to finish the process.
Mobile
- Tap the three dots in the top right corner of a group's screen to open the menu.
- Tap the Chat details button to open the group settings.
- Tap Edit in the top right corner.
- Tap the profile picture.
- Select picture from your file system.
- Tap Save to finish the process.
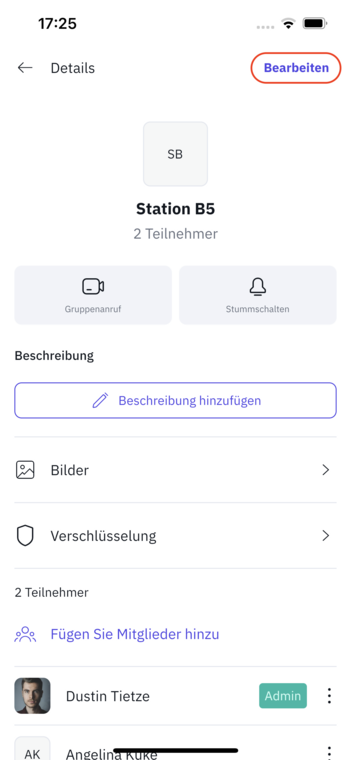
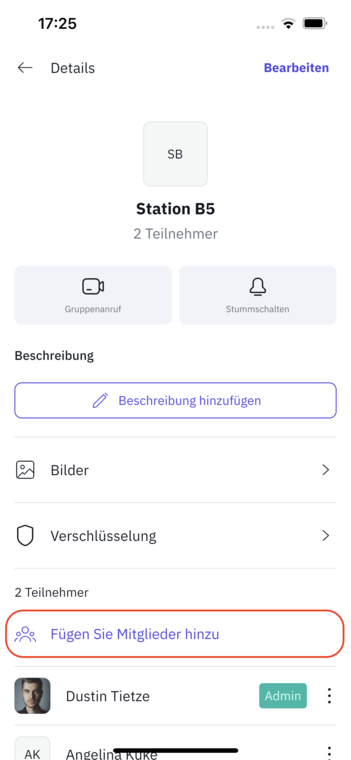
Add people to a group
Groups are the best way to keep conversations about various projects, topics or teams organized in Famedly. Add people to groups to bring the right people and information together in one place. You can add an unlimited number of people to a group. The larger the groups become, the more confusing the collaboration can become. We therefore recommend consciously considering which people are added.
Desktop
- Click the three dots in the top right corner of a group's screen to open the group details.
- Click Members.
- Click + in the upper right corner.
- Click the person you want to add.
Mobile
- Tap the three dots in the top right corner of a group's screen to open the group details.
- Tap Members.
- Tap + in the upper right corner.
- Tap the person you want to add.
Remove people from a group
Famedly organizes conversations between several people in groups. Groups provide order and clarity for work. Create topic-based groups or groups for teams to encourage collaboration. If a person no longer needs to be part of a group, the person can be removed. Administrators of a group can remove people from the group.
If you remove a person from a group, that person can no longer participate in the communication, but still has access to old messages within the group.
Desktop
- Click the three dots in the top right corner of a group's screen to open the group details.
- Click Members.
- Click the three dots menu next to the person name you wan to remove.
- Click
Remove from group.
Mobile
- Tap the three dots in the top right corner of a group's screen to open the group details.
- Tap Members.
- Tap the three dots menu next to the person name you wan to remove.
- Tap
Remove from group.
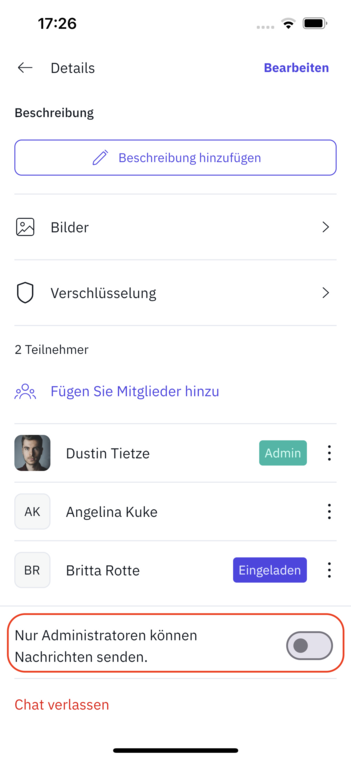
Restrict messaging to group admins
Groups can be set so that only administrators can send messages. This can be particularly useful for groups with many people in which announcements are to be shared. In this case, only admins of a group can send announcements.
Desktop
- Click the three dots in the top right corner of a group's screen to open the group details.
- Click Restrict messaging to group admins to activate it.
Mobile
- Tap the three dots in the top right corner of a group's screen to open the group details.
- Tap Restrict messaging to group admins to activate it.
Promote members to group admin
Desktop
- Click the three dots in the top right corner of a group's screen to open the group chat details.
- Click Show members.
- Click the three dots menu next to the person name you wan to remove.
- Click
Promote to Admin.
Mobile
- Click the three dots in the top right corner of a group's screen to open the group chat details.
- Click Show members.
- Click the three dots menu next to the person name you wan to remove.
- Click
Promote to Admin.
Revoke own admin rights
Desktop
- Click the three dots at the top right of the group chat’s screen to open the group chat details.
- Click Show members.
- Locate your own name in the members list, then click the three dots next to it.
- Choose
Revoke admin rightsto revert to a regular user role.
Mobile
- Tap the three dots at the top right of the group chat’s screen to open the room details.
- Tap Show members.
- Locate your own name in the members list, then tap the three dots next to it.
- Choose
Remove admin rightsto revert to a regular user role.
Inactive chats
If you have any chats that have been inactive for more than the set period (default: 6 months), you will see a banner at the top of the app. If only one chat is inactive, the banner will display "Chatname inactive for X months” (with Chatname replaced by the chat's name). If multiple chats are inactive, it will display “Multiple inactive chats”.
Customize inactivity notification interval
By default, chats are marked as inactive after 6 months, but you can change this setting to better suit your needs.
Desktop
- Click on your profile picture in the top left to open the settings.
- In the settings list, click on Security.
- Click on Inactive Rooms.
- Select your preferred inactivity notification interval (1 week, 2 weeks, 4 weeks, 6 months, 1 year, 2 years).
- Your chosen inactivity notification interval is now set.
Mobile
- Tap your profile picture in the top left to open the settings.
- In the settings list, click on Security.
- Click on Inactive Rooms.
- Select your preferred inactivity notification interval (1 week, 2 weeks, 4 weeks, 6 months, 1 year, 2 years).
- Your chosen inactivity notification interval is now set.
Archive inactive chats
Desktop
- Click the inactive chats banner. If it said a specific chat is inactive, skip the next step.
- Click a chat from the inactive chats list that just has opened.
- Click the button Archive.
- Confirm your choice to archive the chat or cancel to keep the chat.
Mobile
- Tap the inactive chats banner. If it said a specific chat is inactive, skip the next step.
- Tap a chat from the inactive chats list that just has opened.
- Tap the button Archive.
- Confirm your choice to archive the chat or cancel to keep the chat.
Remove inactive chats from the list
If you want to keep an inactive chat room, simply open the chat and dismiss the blue info message at the bottom of the chat by tapping the X button. This will remove the chat from the inactive chat list on all devices. It will only appear in the list again after another period of inactivity, based on your selected interval.
External label
To ensure that no information is unintentionally shared with outside organizations, we have introduced an "external" label. If you invite people to chat rooms, or if chat rooms with external people already exist, they will be marked with the "External" label accordingly.
Chat tips and best practices
- Make sure that the group chats you create or maintain have a clear topic and description so that people understand what they’re used for.
- Make your group chats unique by setting up a profile picture for your group chat.
- Archive group chats when they’re no longer needed.